
Blog

If you have a dock or boat lift, you know that traditional piling doesn't last forever. Piling experience defibration, are prone to wood-boring organisms, and eventually fail. Because piling provides the structure for your dock and lift, there's a good chance too many failing piling mean that you may be looking at a premature repair or replacement. For the homeowner who wants less dock and lift maintenance, we recommend EcoPile. EcoPile is more cost efficient than traditional piling because It NEVER HAS TO BE REPLACED. Other benefits of EcoPile vs. traditional piling include: -immunity to saltwater and wood-boring organisms, this means your EcoPile will never rot! -prolonged structural integrity of your dock or left, increases the amount of time and use you can get out of your dock or lift before a repair or replacement may be needed. -environmentally friendly; EcoPile can be recycled, and don't leach any harmful chemicals into the water. -symmetrical and aesthetically pleasing
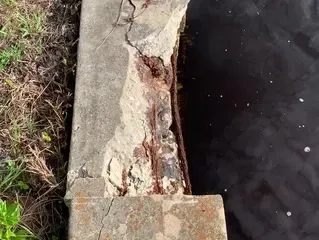
One of the most common questions we receive from customers is “how do I know when it’s time to replace my seawall?” Or alternatively, “can my seawall be repaired or does it need to be replaced?” This is a very important question to ask! A seawall prevents erosion from waves and helps to maintain the size of your property. A failing seawall can lead to property damage, and costly repairs. Furthermore, if you are looking into purchasing a property, knowing the signs of a failing seawall could save you thousands of dollars. Keeping this in mind, here are a few critical signs that your seawall may be in need of replacement: Bends or curves in the seawall- unless you live on a lot that has a radius, seawalls are poured to maintain a straight property line. Therefore, if you look down your seawall and notice a bend, you may be looking at a replacement! Cracks- It’s important to note that not every crack on your seawall spells doom. Concrete naturally cracks over time, but depending on the location and severity of the cracks, you may be looking at a replacement. In particular, a horizontal crack just below the seawall cap is normally an indication that the seawall has failed. Rusted steel rods in seawall- Steel rods within the seawall support the overall structure and shape of your wall. As saltwater enters the concrete these beams expand and rust, which ultimately causes those concerning cracks mentioned in item number 2! If you have exposed rods and you can see that they are rusting, its probably time for a replacement. Fractures and concrete fallout- Finally the most obvious sign of seawall failure is when you experience fracturing or concrete fallout from your wall. To explain both of these issues in plain terms, a fracture is when the wall literally splits in half and concrete fallout is when a large chunk of concrete breaks off your seawall! At this point, your seawall has lost its structural integrity, and needs to be replaced. Still a little unsure if these signs describe your seawall? For visual reference checkout the videos below where owner Zac Extejt walks you through a standard seawall replacement estimate! These same videos can also be viewed on our Facebook Page! However, please keep in mind that just because the seawalls in these videos have failed, there are still lots of examples in which seawalls CAN be repaired!
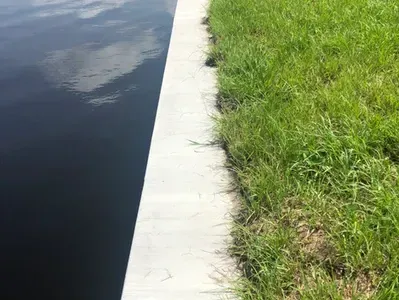
Owning a waterfront home is naturally appealing and desirable. If your property is equipped with a seawall, there are a couple things that you, as the homeowner, can do to protect the longevity of your seawall and the integrity of your property. There are also warning signs to look for before your seawall fails. When cutting your lawn, it is important that the grass is NOT edged at the seawall. The grass should stay level with and allowed to grow slightly over the seawall cap. This will help the water run over the top of the seawall cap rather than draining behind the seawall. If settlement along the rear of the seawall occurs and the ground is lower, water will not run over the cap, causing dirt to wash through the joints and seawall panels. This additional water can cause hydrostatic pressure, which can push the seawall outwards. If the grade is not to the top of the seawall cap, it can easily be corrected by adding more dirt, backfilling (if necessary), and reinstalling sod in the area. Another thing to consider is ensuring your weep holes in the seawall are free and clear of debris. A weep hole is a small opening that will allow water to escape from behind the seawall and equalize the pressure. Over time, these holes can get clogged with leaves and other miscellaneous debris. Weep holes relieve the hydrostatic pressure from behind the seawall and prevent cracking and crumbling, so it is important that they do not get clogged. Along with simple maintenance, there are also warning signs to look for before a seawall fails; the first of which is cracks in the seawall and/or seawall cap. Because a new seawall is going to settle a marginal amount, small hairline cracks may appear in the seawall cap. This is perfectly normal as concrete does tend to have small cracks over time. If the crack is big enough to put your finger in, this is when there may be a bigger issue and a licensed marine contractor should be called to inspect your seawall’s integrity. Another thing to look for is major sink holes behind the seawall. Small holes are normal after a new installation, as the dirt will settle. These can easily be fixed by adding more dirt, marl, rock, or shell. If the sink hole continually gets larger, this may be an indication that the dirt is escaping from behind your seawall. Excessive dirt at the base and/or sides of the seawall may also indicate that there is a leak in need of repair. If you are experiencing any of these issues, contact a local licensed marine contractor to inspect your seawall.
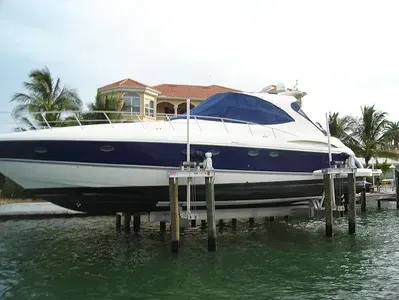
There are two separate weights to any boat; wet weight and dry weight. Dry weight is the weight of a boat without any fluids or accessories added. This is the way that it comes from the factory. Wet weight, on the other hand, is after all fluids and accessories have been added to the boat. When purchasing a boat lift, it is required to know the wet weight of the boat to accurately size the lift. One important point to remember is that the listed weight capacity on the lift must be treated as a max weight. Exceeding the weight capacity of the lift will void any manufactures warranty. Overloading the lift and relying on the safety factor to protect your investment always results in a service call and more expenses for the owner. For the longevity of the lift and integrity of your boat, it is always better to go bigger than to overload and possibly cause catastrophic failure. The wet weight of a boat is relatively easy to determine. Gas weighs approximately 7 pounds per gallon. To find how much weight the gas adds to the overall weight of the boat, multiply the fuel tank capacity by 7. For example, a 2018 22’ Key West 219FS Center Console weighs approximately 2,250 pounds without motor (with 250 hp outboard, add approximately 750 pounds with rigging). This particular boat has an 80 gallon fuel tank, so the gas will add 560 pounds (80 x 7). Another factor to consider is if the boat has one or multiple live wells. Water weighs approximately 8 pounds per gallon. The same steps would apply for the live wells as does the gas. Using the same example boat, there is a 20 gallon live well, so an additional 160 pounds (20 x 8) would be added to the dry weight of the boat. If the boat has a shower station, onboard bathroom, and/or cooler, the tank capacities would need to be multiplied by 8; the same as the 20 gallon live well was in the example. This brings the weight of the example boat up to 3,720 pounds with motor, gas, and water accounted for. The other thing to consider when finding the wet weight is additional accessories and fitting out the boat. Fitting out the boat would include: bimini tops or any other sun/fishing tops, extra seating, fishing gear, towers, generators/AC, etc. Provided additional accessories aren’t heavy additions (such as a tender or davit for larger boats), it is typical to take 15% of the wet weight of the boat to account for these accessories. In the example boat’s case, this would be an additional 558 pounds (3,720 x .15). This bring the grand total WET weight of a 2018 22’ Key West 219FS Center Console to approximately 4,278 pounds. This was found by adding up all weights (2,250 [boat] + 750 [outboard] + 560 [gas] + 160 [water] + 558 [gear]). So again, to review; to find the wet weight of a boat, take the dry weight of the boat + the weight of the motor + the weight of fuel (tank capacity x 7) + the weight of water (tank capacity x 8) + gear (weight of boat with all tanks full x 15%). Once an approximated wet weight is determined and a lift is purchased, a few other factors also play into safe and proper operation of the lift. Although there is a built in safety factor, it is not recommended that these limits be exceeded. There is a greater chance for damage to the lift, boat/watercraft, and individuals the more these limits are exceeded. Another factor to consider is weight distribution. Boat lifts are designed to lift weight equally both forward to aft, and port to starboard. If the boat is loaded even 1’ off of center, this changes the weight distribution by 40%, possibly causing undue wear and damage to the lifter beams, bunks, cables, and even to the piling. Charlotte County Seawalls is proud to be an exclusive Hi-Tide dealer. To view all available options, please visit www.hi-tide.com.
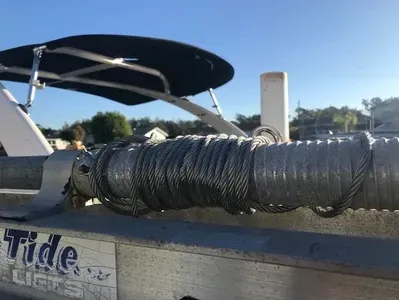
Although there is the occasional rogue squirrel, lightning strike, or equipment malfunction, most cable problems are user error and avoidable. The most common reason a cable will un-spool is lowering the lift too far so that the cradle is resting on the bottom of the boat slip, etc. When this happens, it releases tension on the cables, causing them to un-spool or bird nest. Another reason cables may do this is because the lift was raised too far, causing the cables to overlap on the drive. When this occurs, the cables will overlap and the fibers of the cable will begin to break. Rough water can also play a factor. Some bunks (what the boat sits on) are made of wood and some are made of aluminum. When waves get under the cradle, it causes the wooden bunks to float, putting slack in the cables. To prevent this, extra weight can be added so the wood bunks do not float when the waves hit. The last common cause of cable issues is incorrect rake (pictured to the right). “Rake” is the angle (forward or aft when looking at the lift depending on the direction of the boat) at which the lift is set. This can cause either the front or rear of the boat to lift first, un-spooling the cables, once again possibly overlapping and cutting the cables. If you encounter any of these issues with cables, please call our office at (941) 629-4900 to schedule a cable repair/replacement with our service crew.